


 QQ浏览器
QQ浏览器
 微信
微信
 豆包电脑版
豆包电脑版
 抖音电脑版
抖音电脑版
 鲁大师
鲁大师
 360浏览器
 腾讯电脑管家
 Microsoft Excel 2020
.NET Framework官方版是微软Microsoft开发的代码编程模型。.net framework官方版能完美的支持32位与64位的windows 7与window10系统的使用。
-
1.3 中文版查看
-
2.0 电脑版查看
-
1.51 最新版查看
-
官方版查看
-
4.25 最新版查看

.net framework软件特性
1. .NET Framework 4 将与旧的 Framework 版本并行工作;
2. 默认情况下,基于早期版本的 Framework 的应用程序将继续在目标版本上运行;
3. 公共语言运行时(CLR)和基类库(BCL)改进;
4. 数据访问和建模的改进;
5. ASP.NET 的增强功能;
6. 创新的新并行编程功能,例如并行循环支持.任务并行库(TPL).并行 LINQ(PLINQ)和协调数据结构(可让开发人员利用多核处理器)。
7.此款microsoft .net framework 4.0适合32/64位系统。
.net framework系统要求
支持的操作系统
Windows 7, Windows 7 Service Pack 1, Windows Server 2003 Service Pack 2, Windows Server 2008, Windows Server 2008 R2, Windows Server 2008 R2 SP1, Windows Vista Service Pack 1, Windows XP Service Pack 3
Windows XP SP3
Windows Server 2003 SP2
Windows Vista SP1 或更高版本
Windows Server 2008(在服务器核心角色上不受支持)
Windows 7
Windows Server 2008 R2(在服务器核心角色上不受支持)
Windows 7 SP1
Windows Server 2008 R2 SP1
支持的体系结构:
x86
x64
ia64(有些功能在诸如 WPF 之类的 ia64 上不受支持)
硬件要求:
建议的最低要求:Pentium 1 GHz 或更快,512 MB RAM 或更大
最小磁盘空间:
x86 – 850 MB
x64 – 2 GB
必备组件:
Windows Installer 3.1 或更高版本
Internet Explorer 5.01 或更高版本
.net framework安装步骤
1、在PC下载网下载.net framework官方版的压缩包,解压后,双击exe文件,进入安装界面
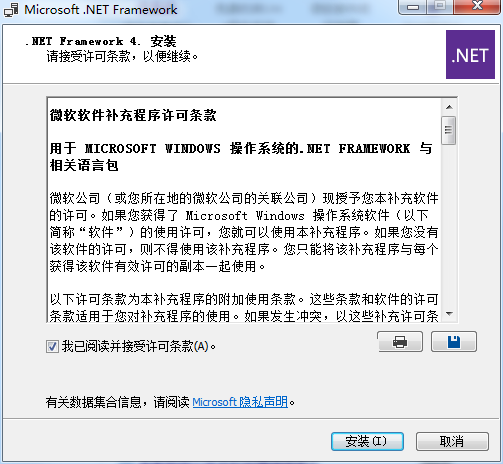
2、查看软件许可协议,选择我已阅读并接受许可条款,点击安装
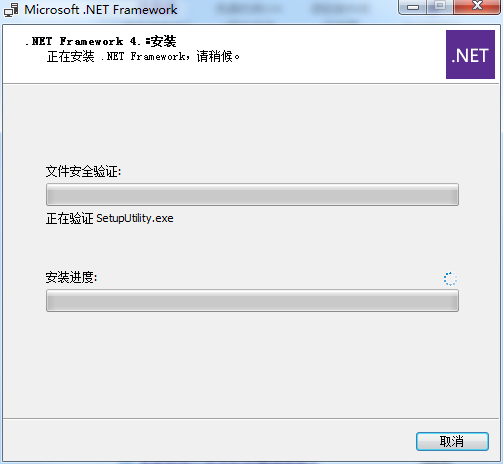
3、.net framework官方版正在安装,我们耐心等待
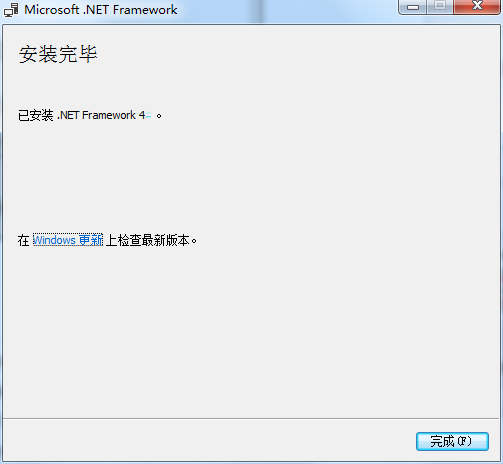
4、软件安装成功,点击完成即可
.net framework使用方法
.net framework安装失败的解决方法
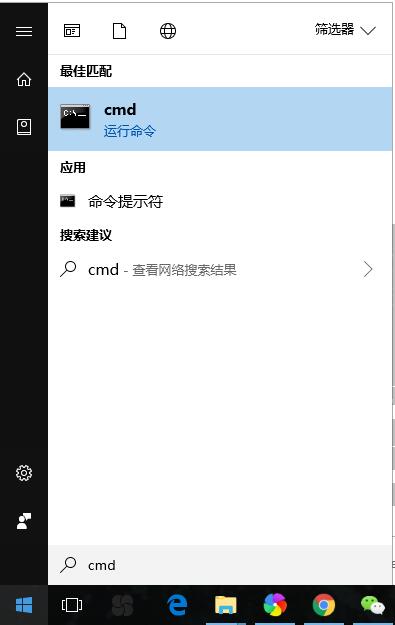
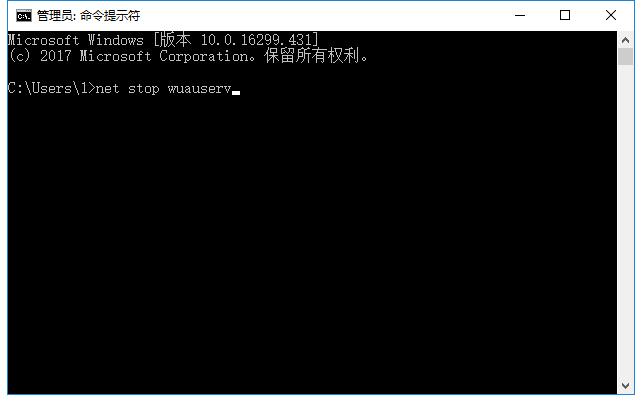
1、使用鼠标左键单击打开计算机桌面左下角的“开始”菜单,并直接输入“cmd”三个字母,系统会自动找到“命令提示符”程序。之后使用鼠标左键单击打开此程序,并在“命令提示符”窗口中输入“net stop wuauserv”再回车,来暂停.net framework的服务。
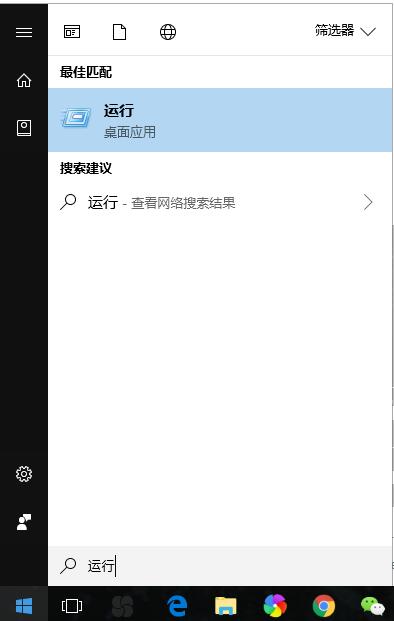
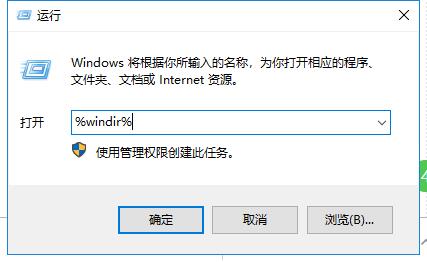
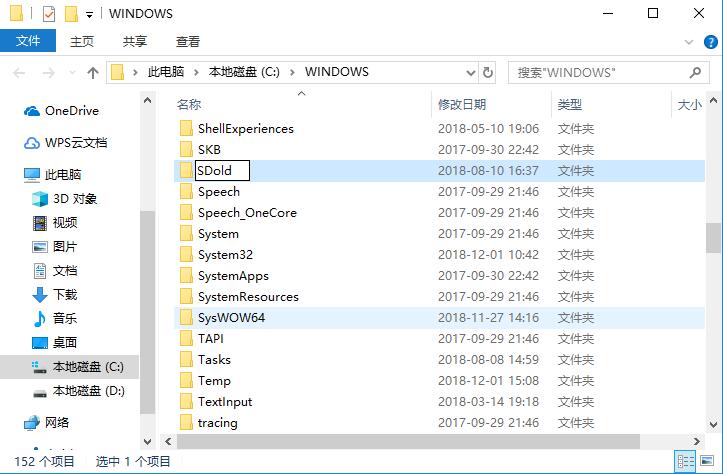
2、然后再次使用鼠标左键单击打开计算机桌面左下角的“开始”菜单,并输入“运行”两个汉字,单击打开搜索到的“运行”程序(或直接使用Win+R快捷键来打开)。在“运行”窗口的输入栏中输入“%windir%”并点击“确定”。
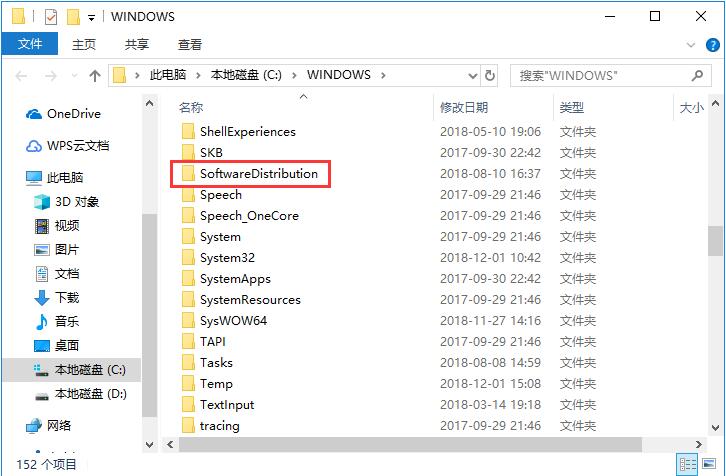
3、之后会打开一个新窗口,在此文件夹中找到名为“SoftwareDistribution”的文件夹,然后直接将此文件夹改名为“SDold”并确定。
4、之后我们再次使用鼠标左键单击打开计算机桌面左下角的“开始”菜单,输入“cmd”三个字母的方式打开“命令提示符”窗口,这次需要在输入栏中输入“net start wuauserv”来开启.net framework 4.0的服务。

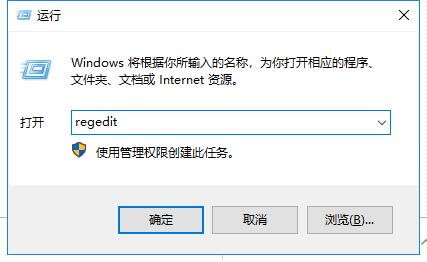
5、然后再次使用鼠标左键单击打开计算机桌面左下角的“开始”菜单,单击打开“运行”程序(或直接使用Win+R快捷键来打开)。在“运行”的窗口中输入“regedit”并点击“确定”。
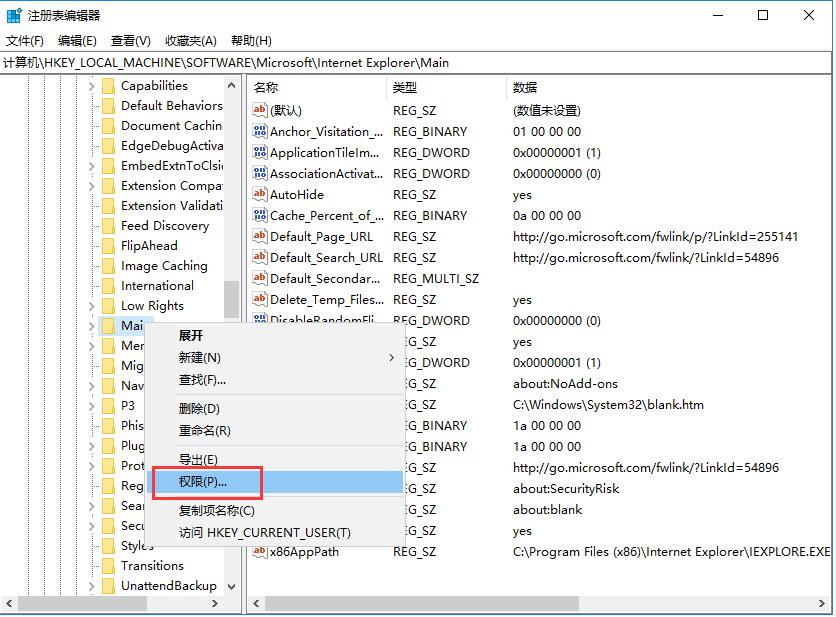
6、然后在打开的“注册表编辑器”窗口中找到HKEY_LOCAL_MACHINE→SOFWARE→Microsoft→Internet Explorer文件夹下的MAIN子文件夹,并直接用鼠标右键单击该文件夹。之后在打开的右键菜单中单击选择“权限”一栏。
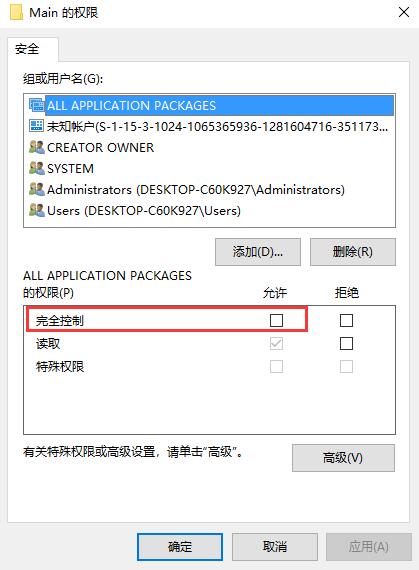
7、 然后在打开的新窗口中,找到“完全控制”一栏,将后方的“允许”下的空白框体单击勾选上,然后点击“确定”即可。
8、这样.net framework 4.0就能成功安装了,快来试试吧。
.net framework常见问题
如何卸载.net framwork?
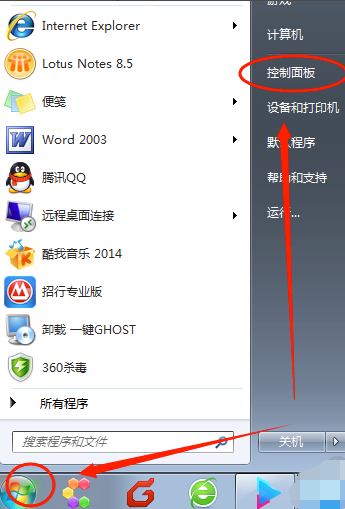
1、使用鼠标左键单击打开电脑屏幕左下方的“开始”菜单,点击打开其中的“控制面板”选项。
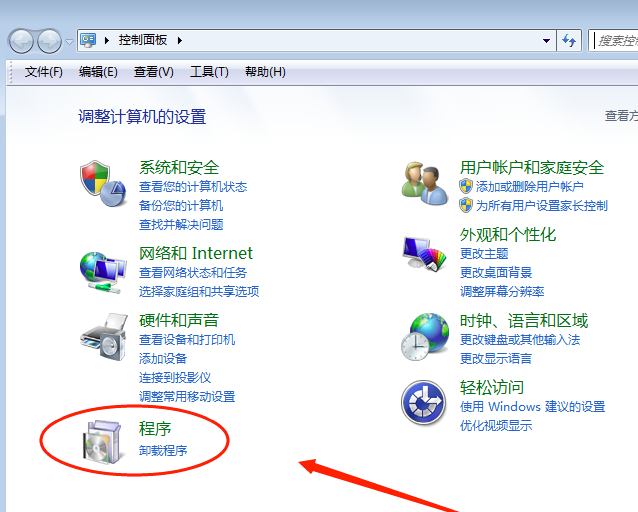
2、在控制面板窗口中,找到“程序”菜单,使用鼠标左键单击下方的“卸载程序”功能 。以win7操作系统为例,如果是其他windows操作系统可能会有差异。
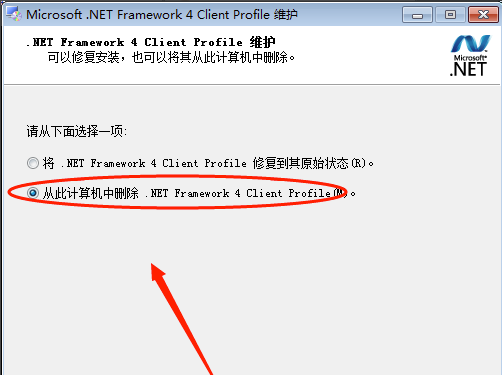
3、之后在卸载或更改程序列表总,找到需要卸载的.net framwork,选中该项,然后使用鼠标右键单击,并在右键菜单中选择“卸载、更改”选项。

4、之后会打开.net framwork的卸载窗口,我们需要选择的是“从此计算机中删除.NET Framwork 4 Client Profile”选项,然后点击下方的“继续”按钮。
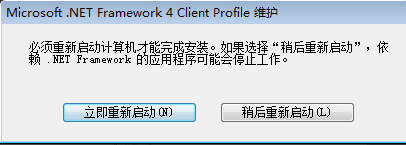
5、之后只需静静等待卸载完成,这个过程可能较长,请耐心等待。

6、.net framwork卸载完成后,需要重启电脑才能完全卸载。如果计算机仍在进行其他工作的话,可以选择“稍后重新启动”。
.net framework更新日志
1.修正了其它bug;
2.优化了软件的兼容性
小编推荐:.net framework支持多种操作系统,快来PC下载网下载吧,另外还有microsoft .net framework 4.6.1提供下载。


 搜狗浏览器
搜狗浏览器
 360软件管家
 腾讯视频播放器
 优酷客户端
优酷客户端
 爱奇艺
爱奇艺
 向日葵远程控制软件
 网易云音乐
网易云音乐
 WPS Office
 CorelDraw X4
 腾讯应用宝
腾讯应用宝
 百度网盘
百度网盘
 游戏加加
游戏加加
 网易MuMu12
 Origin橘子平台
 迅雷11
迅雷11
 AutoCAD2007
 益盟操盘手
益盟操盘手
 千牛卖家版
千牛卖家版